Computer Setup for IST263
In this class you will use tools and workflows that web developers use in the industry. Also, it is a lot more efficient than using the typical LMS. It will seem foreign when you start but be a little patient & persistant.
A separate page gives guidance for working with GitHub once you have created your account there: work-with-github.
1. Integrated Development Environment (IDE)
If you have used programs like MS-Word, you have used an IDE. IDEs are specialized programs that provide features and tools that make your development process efficient. Just like you would use MS-Word to write and format papers, resumes, or letters we will use something similar in this class to write HTML, CSS and some Javascript.
VS Code
You can download the free version from https://code.visualstudio.com/download. Choose the correct installer based on your computer OS.
Once the download is complete, launch the installer and follow the steps.
2. Git & GitHub
These are 2 different tools - don't let the names confuse you. Below is a brief explanation of what they are
git
git is a program that you install on your computer which can be used to keep track of changes in any set of files. It is a distributed version control system primarily used in software development. You might have used the 'Track Changes' feature in MS-Word - git does all that and a lot lot more.
GitHub
GitHub is a web-based git server. It complements git in ways that makes it possible for a team of developers to contribute to a single project. It also provides a way to store your code remotely.
Follow these steps to configure your computer
Setting up Git & GitHub
-
Signup for a Free GitHub Account. If you already have a GitHub Account skip to step 2
- Go to github.com
- Click Signup
- Choose a username like
netid-su. Ex: My username would beakadajis-su - You can use your SU email
- Click 'Create an Account'
- In the next page choose 'Unlimited Public repositories for free' plan.
- Click 'Continue'
- Choose the appropriate boxes in the next step
- Click 'Submit'
- You should have received an email from GitHub. Open the email and click 'Verify your email address' to complete the process. You now have a GitHub account.
- You will need your GitHub username and password in Step 2
-
Installing GitHub Desktop Client
- Go to desktop.github.com
- Download the program installer appropriate for your version of the OS.
- Once the download is complete, launch it and follow the steps to install it
- After it is installed, launch it and click on 'Sign into GitHub' and enter you GitHub username and password that you created in Step 1
- In the 'Configure Git' screen enter your Name and Email and click 'Continue'
- Click 'Finish' to complete GitHub & Git installation
3. Setup Class Folder aka Repo on GitHub
This final step will walk you through downloading the class folder aka repo from GitHub.
These first 5 steps will create your course folder/repo on GitHub
-
Click the link https://github.com/ist263-talley/fall2019-m01 to get started.
-
You will be asked to signin with your GitHub username and password if you are not signed in.
-
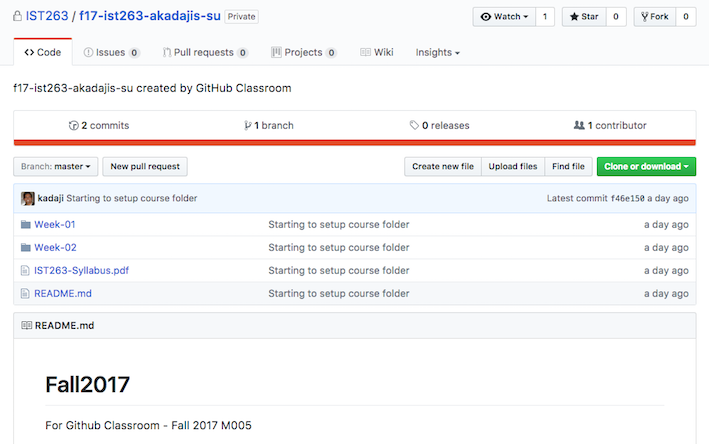
Clicking on the link (yours will be similar) will bring to a page like this. If you see this you are almost there.

-
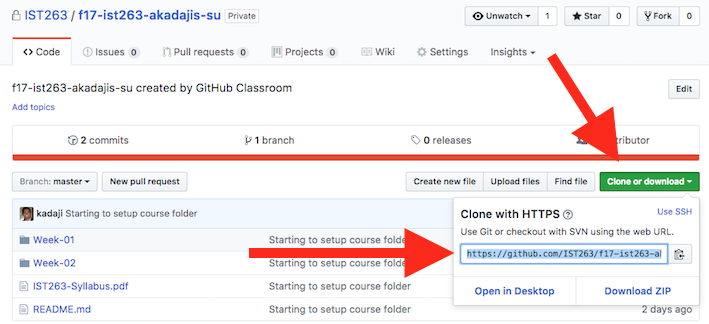
Copy the Repo URL

4. Setup or Cloning Class Folder on your laptop
These final steps will walk you through downloading the course folder from GitHub onto your computer
-
Launch the Github Client that you have installed on your computer
-
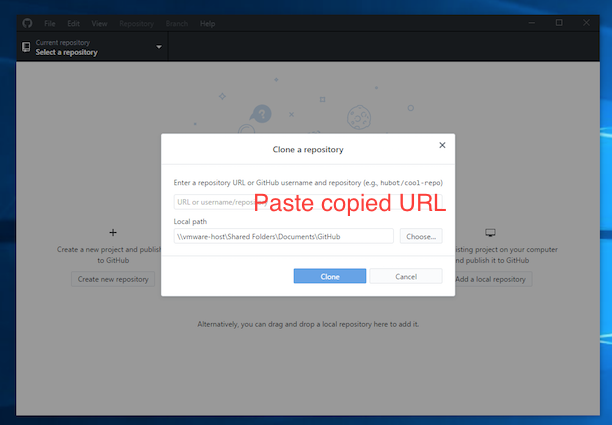
After the client has launched, click on the 'Clone a repository' button. You can also click on 'File' -> 'Clone Repository'
-
Paste the URL you copied in step 3.6 into the box.

-
Local Path refers to the folder on your computer where you want the course folder to reside. Click 'Choose' and browse to say your 'My Documents' folder
-
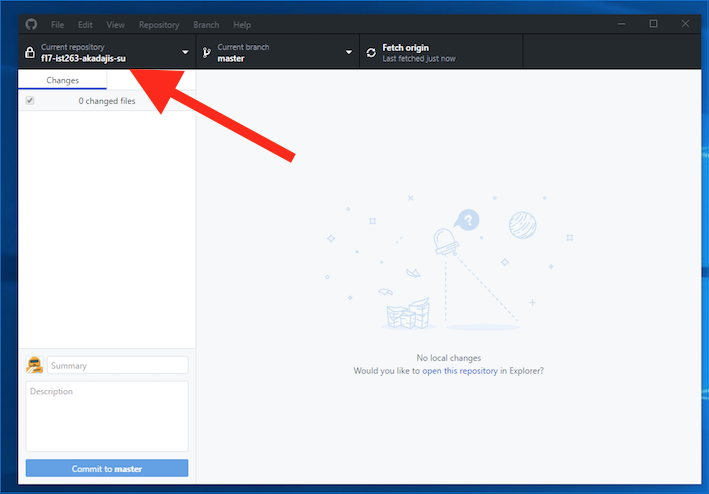
Click 'Clone'
-
Good work. You are done...cloning the class repo.


